Step 1: Create An Apple ID For Your Organization
To create a developer account and join the Apple Developer Program, you first need to have an Apple ID. NOTE: Once you've created your Apple ID, you must turn on two-factor authentication with your Apple ID in order to create an Apple developer account.
To get started, click here to create an Apple ID for your organization. Please skip to Step 2 if you already have an Apple ID associated with your organization.

As soon as you've completed the form and clicked "continue," a new window will open up asking for the verification code. After that, a verification number will be emailed to the email address you just provided when registering your Apple Developer account.
After this step, you will be redirected to the Apple agreement page where you can review the agreement. Select the checkbox and click on the submit button.
Step 2: Enroll For The Apple Developer Program
Once you have created an Apple ID and DUNS number for your organization, you can easily begin to enroll in the
Apple Developer program which gives you the ability to make
your apps are available on the Apple App Store for iOS users.
1) To get started, click here, then click on the blue "Start Your Enrollment" button to proceed.

2) After this, if you're not already logged into your Apple ID account, you will be redirected to a screen where you have to sign in using your Apple ID and password.

3) After you've logged, you will be redirected to a screen where you have to confirm your personal information then click "Continue."

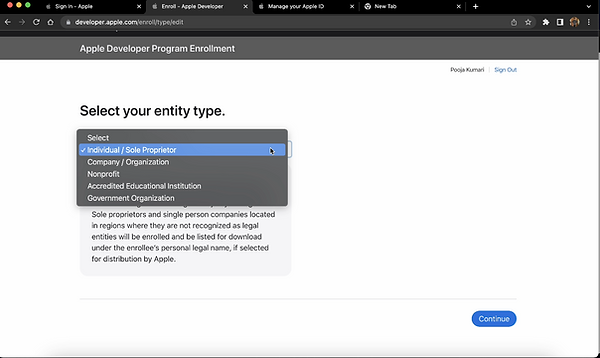
3) After filling all details and clicking continue, you will be asked the type of account you want to enroll as an organization.
NOTE: APPLE ONLY ALLOWS NON-PROFIT ENTITES TO
RECEIVE DONATIONS. Company/Organizations will not be allowed to use NOWCAST Giving Tab or Giving links on IOS Devices.

4) Enter your DUNS Number and Legal Entity Name exactly as they appear in the DUNS email that was emailed to you, then
Click Continue.

5) Here you will fill out the legal information for your organization. For Your Work Email, apple requires an email that uses your organization name as the domain name. (ie. info@yourbusinessname.com.


6) Next, please look over the terms and click "Continue" if you agree with them. You will then be taken to the payment section. Here, you will have to pay the $99 yearly membership fee for the Apple Developer program.
Applying for a Fee Waiver (Optional)
If you’re planning on applying for a Fee Waiver, make sure to fill out the “EIN Tax ID” information (It's not optional if you want a fee waiver) and select “Yes, I would like to request a fee waiver” for the Fee Waiver section at the bottom of the page.
(Fee Waiver can be applied by only non-profit organization).

To learn more about the fee waivers and eligibility, please go here.
7) After submitting your registration, you will receive acknowledgement and membership confirmation mail.

Within the next 3 days Apple will either call or email the person listed as the verification contact.
If you have not heard from Apple by the fourth day, send apple an email concerning your enrollment by clicking here and choosing Membership & Account > Program Enrollment > Email.
Step 3: Add Details To Your NOWCAST Settings
1) Sign into your NOWCAST Dashboard at dashboard.nowcast.cc, and then go to Settings > Developer Accounts. Under the Apple logo click Edit. Now you will enter the info used to enroll in the Apple Developer program:

Enter your Apple ID

Enter your DUNS number

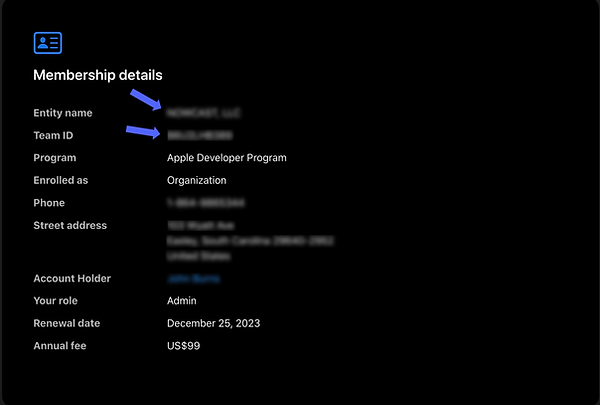
2) In order to get your Entity Name & Team ID, Login with your organization's Apple ID into your Apple Developer Account and then select Membership Details on the top navigation bar.

3) You will then see your Membership details.

4) Copy your Entity Name and Team ID, pasting them into your Apple Developer Account Page in (Settings > Developer Accounts > Apple > Edit) of your NOWCAST application and Save it.

Step 4: Invite NOWCAST to have Admin Access to your Apple Developer's Account
After your Apple Developer account is approved, you have to send an Invitation to NOWCAST so that we NOWCAST will have the ability publish and manage your apps.
1) Login with your organization's Apple ID in the App Store Connect section of your Apple developer account then select the Users and Access

2) Then select the blue plus (+) button next to users.

3) Fill the invitation form mentioning the below details and then select Invite
● First name: John
● Last name: Nowcast
● Email: apple@nowcast.cc
● Roles: Admin
Then click the Invite button.
